
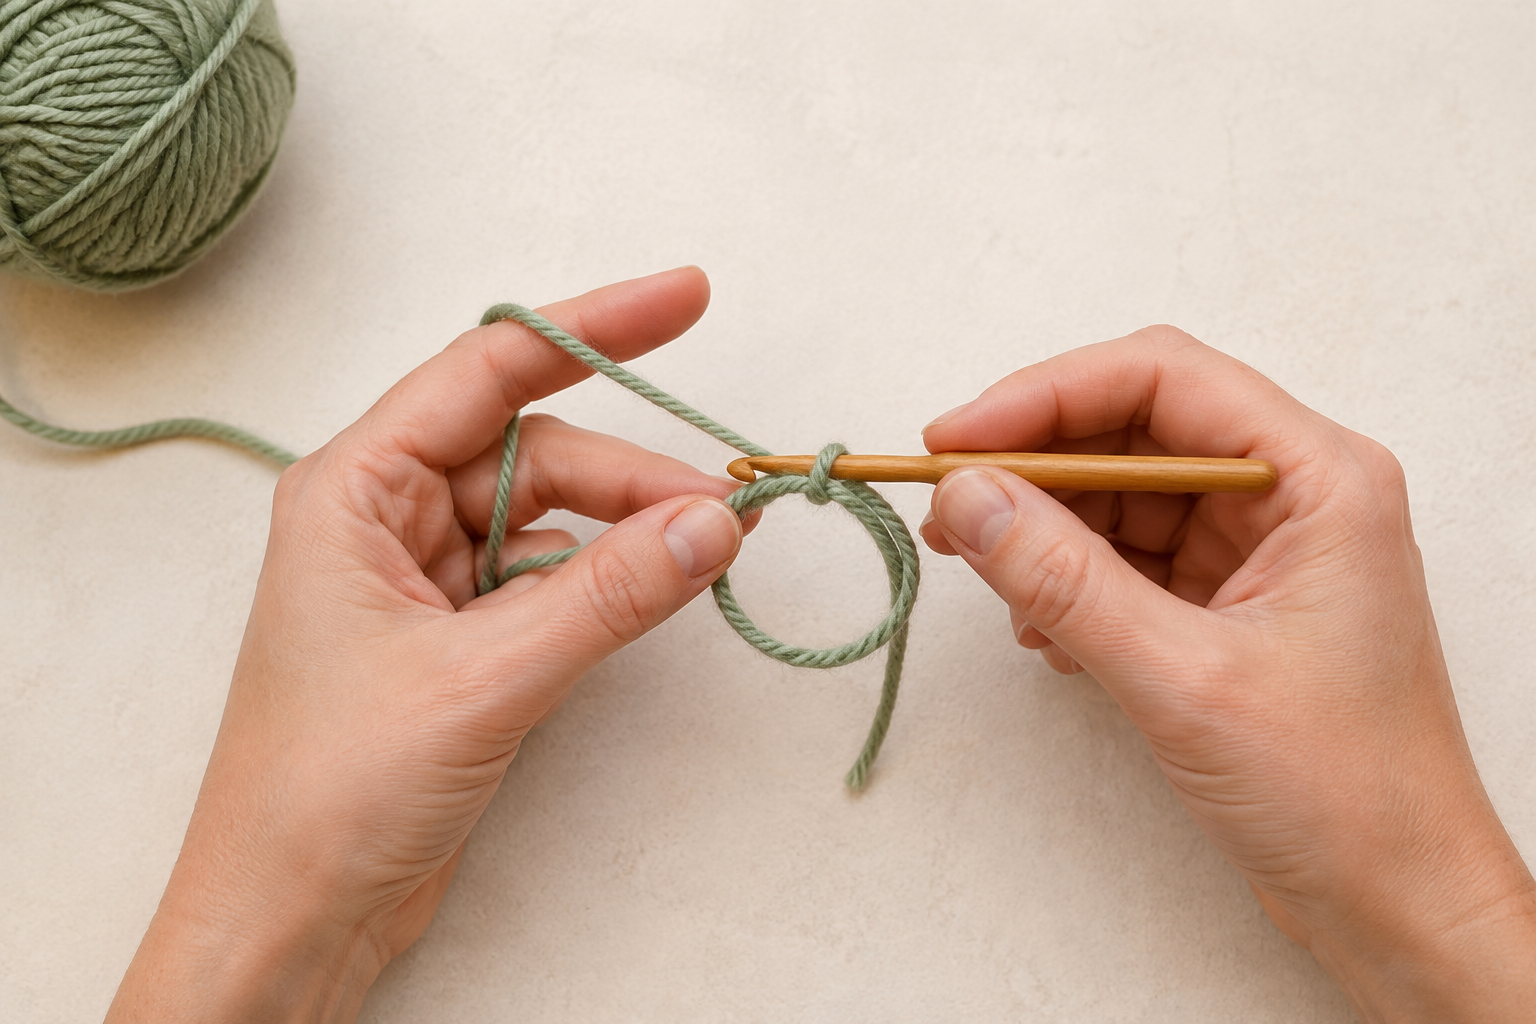
If a crochet pattern tells you to begin with a magic circle, magic ring, or adjustable loop, all three terms usually mean the same technique. A magic circle lets you crochet stitches into an adjustable loop and pull the center closed.
It is especially useful for amigurumi, hats, granny squares, flowers, and other projects worked in the round.
In this beginner-friendly tutorial, you will learn how to make a magic circle in crochet, add six single crochet stitches, close the center, and secure the yarn tail so your work stays neat.
What Is a Magic Circle in Crochet?
A crochet magic circle is an adjustable starting loop used for crocheting in the round. Unlike a fixed chain ring, it can be tightened after the first stitches are made. This creates a clean center with little or no visible hole.
The magic circle technique is commonly used when making:
- Amigurumi animals and dolls
- Crochet hats worked from the crown
- Granny squares and circular motifs
- Crochet flowers and coasters
- Round appliques
- Crochet baskets
- Projects worked in continuous rounds
If you are new to round projects, you can also read our guide to crochet joined rounds.
What You Need to Make a Crochet Magic Circle
You do not need any special equipment to make a magic circle. Prepare the following basic crochet supplies:
- Medium-weight yarn in a light color
- A crochet hook that matches your yarn
- Scissors
- A yarn needle for weaving in the tail
- An optional stitch marker
How to Make a Magic Circle in Crochet Step by Step
Step 1: Make a Loose Yarn Loop
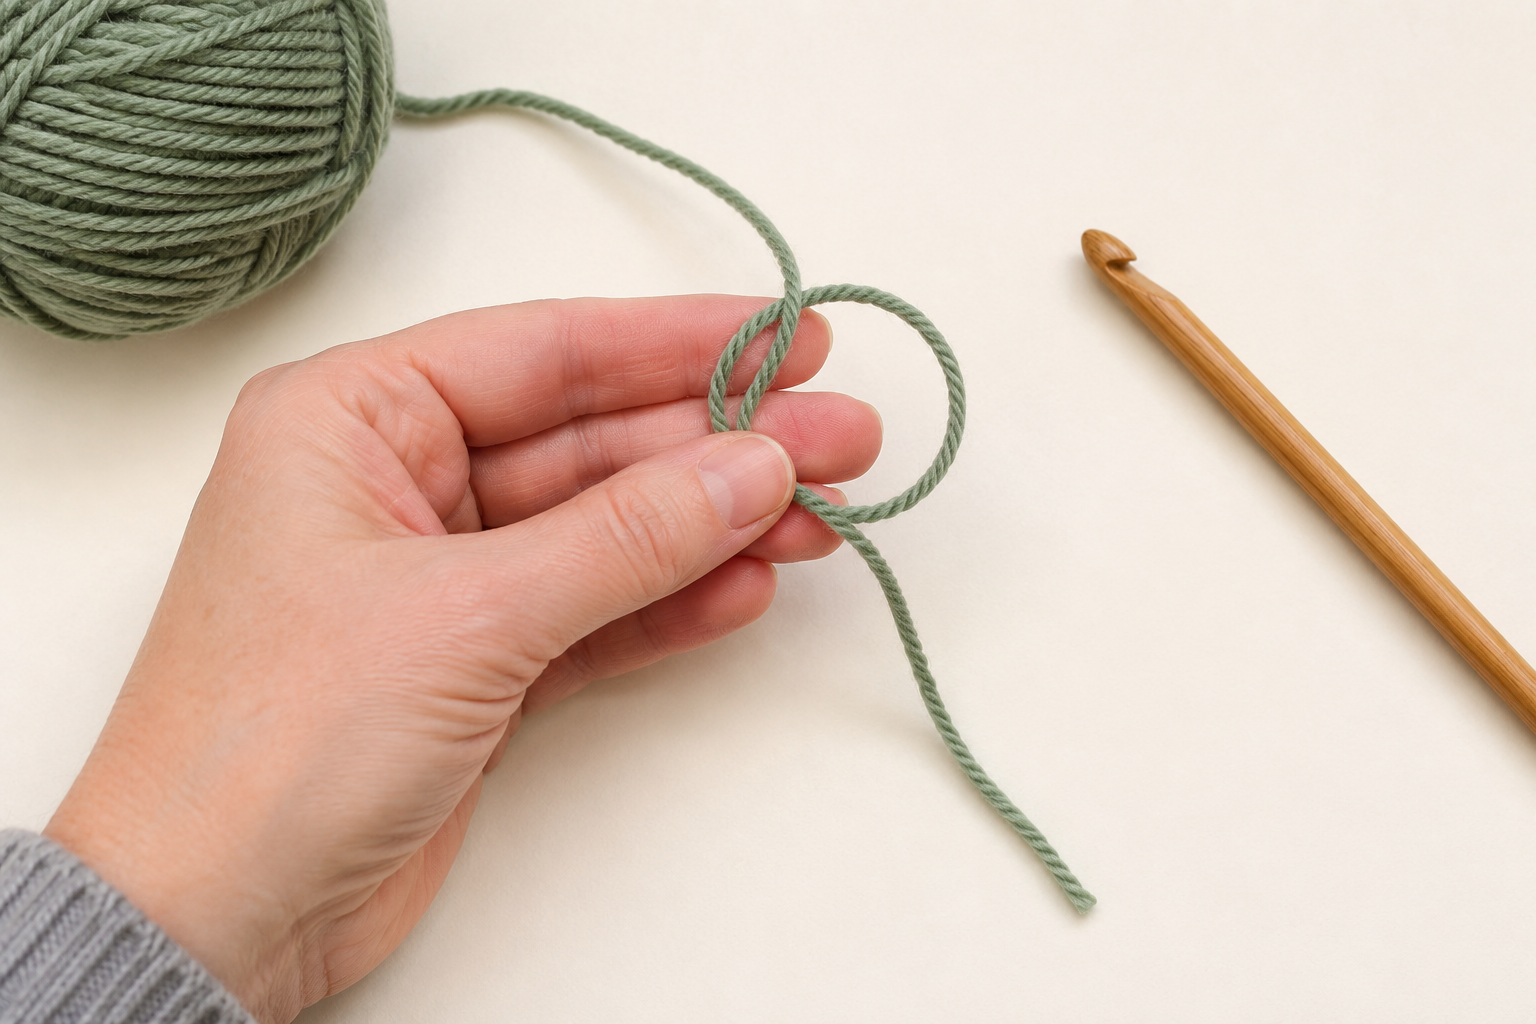
Leave a yarn tail approximately 6 inches long. Form a loose loop, making sure the tail crosses under the working yarn. The working yarn is the strand connected to the yarn ball.
Hold the crossing point between your thumb and middle finger. This prevents the loop from twisting or falling apart while you insert the crochet hook.
Step 2: Insert the Crochet Hook
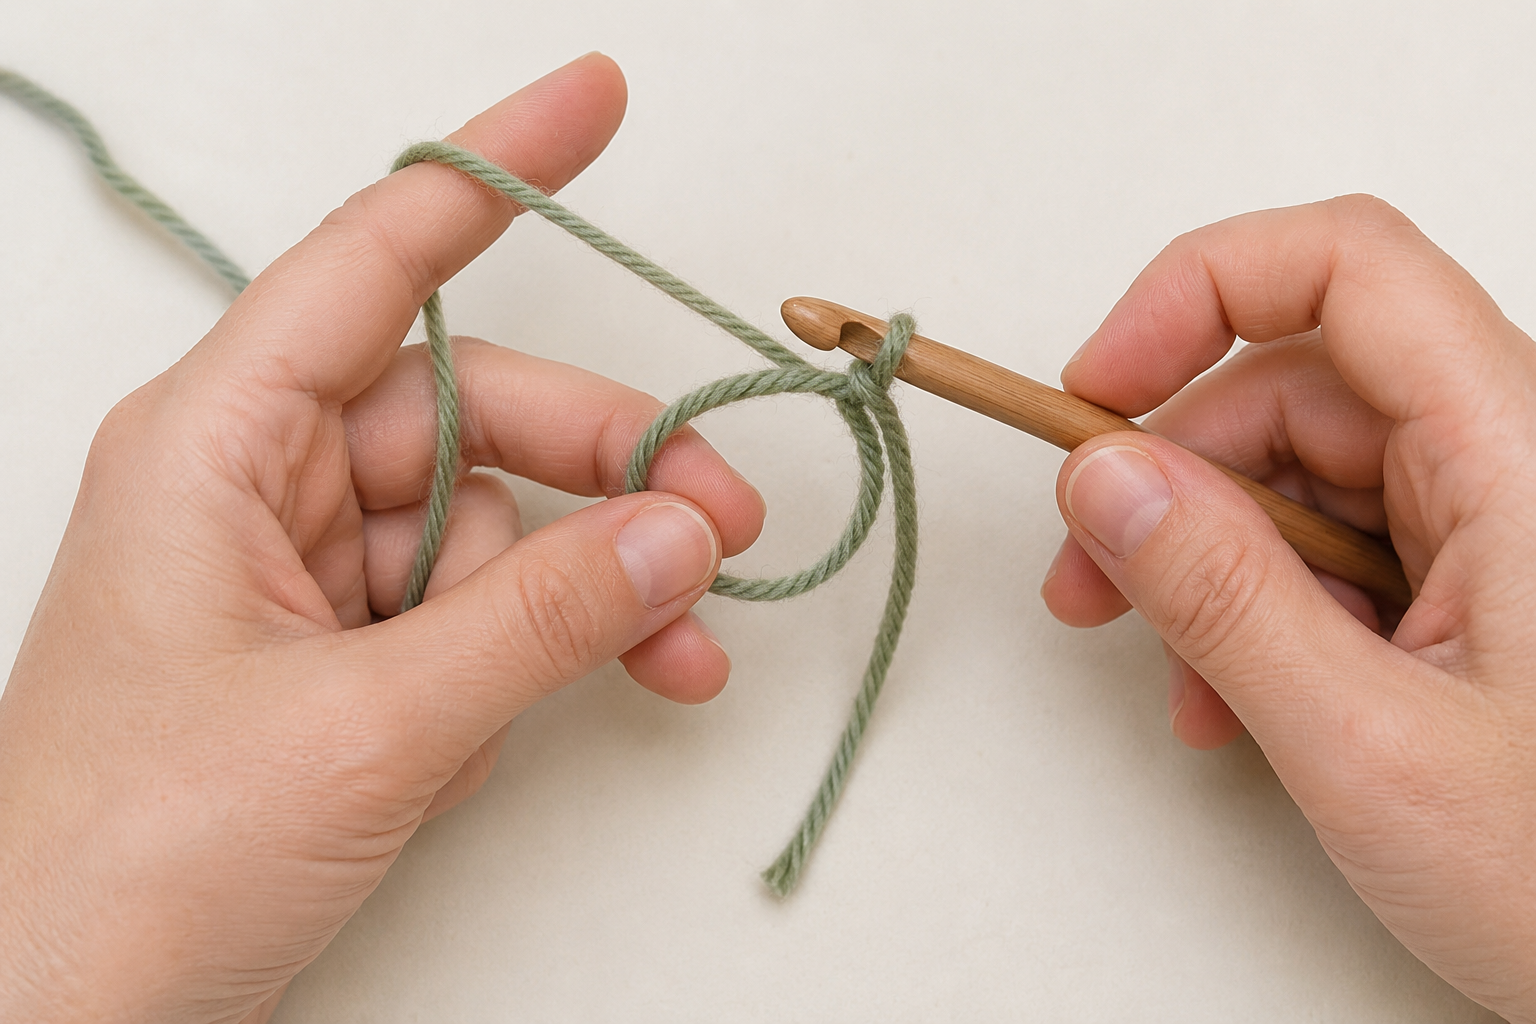
Insert your crochet hook through the center of the large yarn loop. Keep holding the crossing point with your fingers so the loop remains open.
Position the hook underneath the working yarn. Make sure you catch the working yarn instead of the short yarn tail.
Step 3: Pull Up a Loop
Use the hook to catch the working yarn. Pull it back through the center of the large loop.
You should now have one smaller loop on your crochet hook. The original large loop should remain open and adjustable.
Step 4: Chain One to Secure the Loop
Yarn over and pull the yarn through the loop on your hook to make one chain. This chain secures the magic circle so you can begin crocheting stitches into it.
When working with single crochet, this starting chain usually does not count as the first stitch. However, always check the instructions in your crochet pattern.
Step 5: Crochet Stitches Into the Magic Ring
Insert the hook into the center of the large ring. Make sure the hook goes under both the ring and the yarn tail.
Work the number of stitches required by your pattern. Many beginner amigurumi patterns begin with six single crochet stitches inside the magic circle.
To make one single crochet stitch:
- Insert the crochet hook into the center of the ring.
- Yarn over and pull up a loop.
- You should now have two loops on the hook.
- Yarn over again.
- Pull the yarn through both loops on the hook.
Repeat these steps until you have six single crochet stitches, or the number of stitches required by your pattern.
Remember to crochet around both the large loop and the yarn tail. This allows the tail to tighten the center after you complete the first round.
Step 6: Pull the Tail to Close the Circle
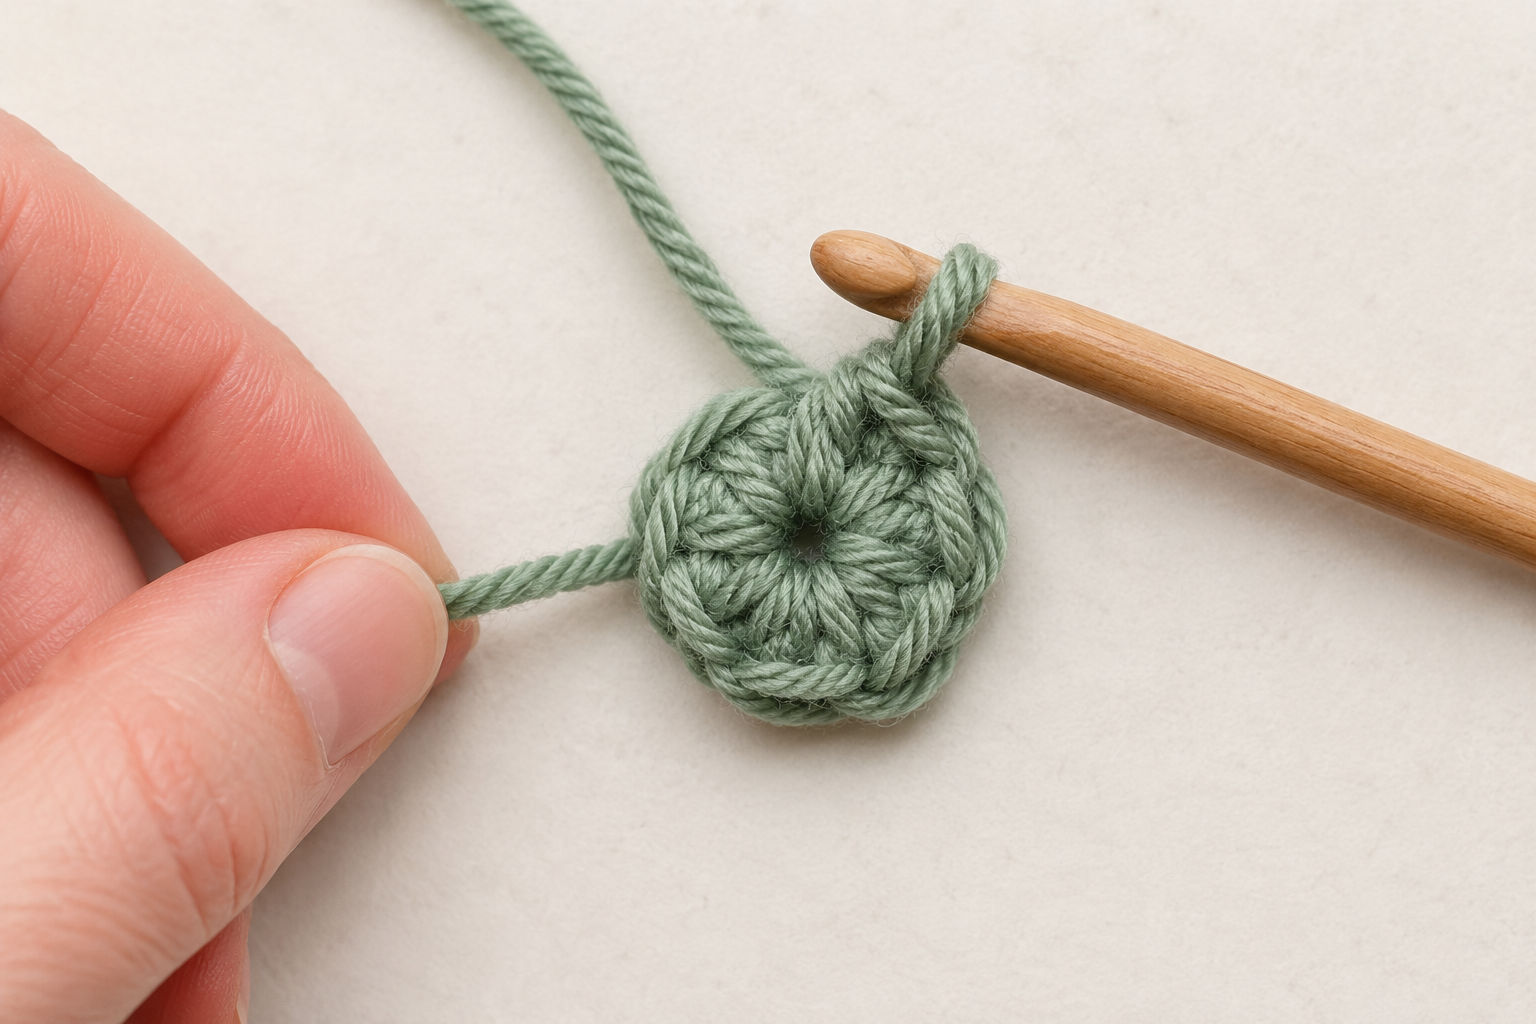
Hold the crochet stitches with one hand and gently pull the yarn tail with your other hand.
As you pull the tail, the large loop will become smaller and the center hole will begin to close. Continue pulling until the stitches form a neat circle with little or no visible hole in the middle.
Pull the yarn firmly, but avoid using too much force because some yarn fibers can break.
Step 7: Continue With the Next Round
Continue with round two according to your crochet pattern. Depending on the project, you may work in continuous spiral rounds or join the first round with a slip stitch.
If your project uses joined rounds, follow our step-by-step crochet joined rounds guide.
Step 8: Secure the Yarn Tail
Do not cut the yarn tail immediately after closing the magic circle. Complete a few more crochet rounds first.
Thread the tail onto a yarn needle and weave it under several stitches on the wrong side of your project. Change direction at least once while weaving.
This helps prevent the center of the magic circle from opening during use or washing.
Magic Circle Abbreviations in Crochet Patterns
Crochet pattern designers may use several names and abbreviations for the magic circle technique:
- MR – Magic ring
- MC – Magic circle
- Magic loop – Another name for the same technique
- Adjustable ring – A loop that can be pulled closed
For example, the instruction “6 sc in MR” means that you should make a magic ring and work six single crochet stitches into it.
Always check the abbreviation section of your pattern because crochet terminology can vary between different designers.
Common Magic Circle Problems and Easy Solutions
The Magic Circle Will Not Tighten
If your magic circle does not tighten, you may have crocheted around the wrong yarn strand. The yarn strands may also be twisted.
Before completing all the stitches, test the ring by pulling the yarn tail gently. If the large loop starts becoming smaller, you are pulling the correct strand.
The Yarn Loop Keeps Falling Apart
Pinch the crossing point firmly while pulling up the first loop and making the securing chain.
Keep the first few stitches close together and maintain light, steady yarn tension. Do not pull the magic circle closed until all the first-round stitches are complete.
The Center Opens After Finishing
The center may open if the yarn tail is too short or has not been woven in securely.
Leave a yarn tail that is at least 6 inches long. After completing several rounds, weave the tail under multiple stitches and change direction before cutting the remaining yarn.
The First Round Is Too Tight
Do not close the center before completing all the stitches in the first round. Keep the large loop open while crocheting, then pull the tail gradually.
If your hook cannot enter the stitches when you begin round two, relax your yarn tension and try again.
The Stitches Are Difficult to Count
Count only the actual crochet stitches. Do not count the starting chain unless the pattern specifically says that it counts as a stitch.
Place a stitch marker in the first single crochet when working in continuous rounds. This makes it easier to identify the beginning of each new round.
The Yarn Tail Breaks
Some delicate or loosely spun yarns can break if pulled too quickly. Tighten the center slowly and hold the stitches close to the ring while pulling.
If the yarn does not slide easily, a chain ring may be a safer alternative for that particular project.
Magic Circle vs. Chain Ring
| Feature | Magic Circle | Chain Ring |
|---|---|---|
| Center size | Adjustable and can close tightly | Fixed after the chains are joined |
| Best for | Amigurumi, hats, motifs and flowers | Open-center designs and simple projects |
| Beginner difficulty | Takes a little practice | Often easier for complete beginners |
| Finished appearance | Creates a neat, closed center | May leave a visible center hole |
| Security | Secure when the tail is woven in correctly | Stable but cannot be tightened afterward |
A chain ring can be useful if your yarn is too fragile to slide or if your pattern intentionally needs an open center.
However, a magic circle usually provides a cleaner finish for amigurumi, crochet hats, flowers, granny squares, and other projects worked from the center.
How to Make a Left-Handed Crochet Magic Circle
The magic circle technique is the same for left-handed crocheters, but the hand positions are mirrored.
Hold the adjustable yarn loop in your right hand and use the crochet hook in your left hand. Make sure the yarn tail can still slide when pulled.
Follow the same basic sequence:
- Form a loose yarn loop.
- Insert the hook through the center.
- Pull up the working yarn.
- Chain one to secure the loop.
- Crochet the required stitches into the ring.
- Pull the tail to close the center.
Can You Use a Magic Circle With Different Crochet Stitches?
Yes. A magic circle can be used with single crochet, half double crochet, double crochet, and other crochet stitches.
The number of starting chains may change depending on the stitch and the instructions in your pattern:
- Single crochet: Usually chain one.
- Half double crochet: The pattern may ask you to chain one or two.
- Double crochet: The pattern may ask you to chain two or three.
Always follow the pattern instructions to determine whether the starting chains count as the first stitch.
Frequently Asked Questions
Is a magic ring the same as a magic circle?
Yes. Magic ring, magic circle, magic loop, and adjustable ring are common names for the same crochet starting technique.
How many stitches go into a crochet magic circle?
Use the number required by your crochet pattern. Six single crochet stitches are common for amigurumi, but some projects may begin with more or fewer stitches.
Does the starting chain count as a stitch?
When using single crochet, the starting chain usually does not count as a stitch. Pattern instructions can vary, so always check the designer’s notes.
Why does my crochet magic circle come undone?
The yarn tail may be too short or may not have been woven in securely. Leave a tail of at least 6 inches, close the ring after the first round, and weave the tail under several stitches while changing direction.
Can I use a magic circle for double crochet?
Yes. After forming the adjustable loop, make the number of turning chains required by your pattern. Then work the double crochet stitches into the center of the ring.
What can I use instead of a crochet magic circle?
You can chain two and work the first-round stitches into the second chain from the hook. You can also make a short chain and join it with a slip stitch to form a ring.
These methods can be easier for some beginners, but they may leave a small visible hole in the center.
Why is a magic circle useful for amigurumi?
A magic circle creates a tight center that helps prevent stuffing from showing through the first round of an amigurumi project.
Should I knot the yarn tail?
A knot is not always necessary. The most important step is weaving the tail securely under several stitches and changing direction before cutting it.
Practice Your New Crochet Skill
The magic circle may feel awkward during your first few attempts, but the hand movements quickly become easier with practice.
Use smooth yarn, keep the loop loose until all the first-round stitches are complete, and always secure the yarn tail carefully.
Ready to use your new skill in a real crochet project? Try our beginner crochet turtle guide, explore our crochet flower bouquet tutorial, or learn how to follow a crochet pattern.
Once you master this useful technique, you will be ready to create cleaner amigurumi, hats, flowers, granny squares, and many other projects worked in the round.














Leave a comment